Shibboleth is one of many SSO providers that are available in the open source identity ecosystem. Shibboleth implements SAML (also OIDC) providing IDP (Shibboleth Identity Provider 5) and SP (Shibboleth Service Provider 3) products while also providing a Discovery Service and Metadata Aggregator tools to supplement the SAML ecosystem.
In SAML the term IDP refers to the Identity Provider, which aims to protect applications or services with authentication to verify the users identity before giving them access. Meanwhile the SP refers to the Service Provider naturally referring to the service or application a user is attempting to access.
![]()
Shibboleth has an interesting history of development from the days when SAML was first being developed to now being managed by the Shibboleth Consortium. The name also has equally interesting origins in Biblical Hebrew, the start of the word sh was incorrectly pronounced sibboleth, people misprouncing the word led them to be declared as outsiders to the group. In this context Shibboleth seems an apt name for an SSO protecting an applications and services.
This article will focus on configuring Shibboleth IDP and Nextcloud to enable SAML SSO functionality. Over the course of this article we will use other tools such as Apache2 as a reverse proxy and use Docker to host Nextcloud.
Shibboleth IDP
The Shibboleth IDP is provided as a tar or zip containing scripts to install Shibboleth. The installation script provides a step by step CLI process to installation the application but we will use a properties file to conduct an unattended installation. The file contains the hostname, the installation directory shibboleth will install its components, an entityID is an identitifier which is also found in the metadata XML usually pointing to a URL where the metadata is located.
idp.target.dir=/opt/shibboleth-idp
idp.host.name=example.com
idp.entityID=http://auth.example.com/idp/shibboleth
The install script should ingest the properties.txt file with all the defined variables. The installation will copy the example and base configurations, the generated certficates for signing and encrypting SAML requests and a WAR file.
/path/to/shibboleth/bin/./install.sh --propertyFile /opt/properties.txt
The script automatically builds a idp.war file in the war folder in /opt/shibboleth-idp/. Shibboleth allows you to customise the login page with a logo, background, organisation name etc. The file messages/messages.properties can be configured with the location of a custom css, where a background splash image can be declared and the location of the logo. The css and images are located in /opt/shibboleth-idp/edit-webapp and the webpages can be modified in /opt/shibboleth-idp/views.
idp.css = /css/custom.css
idp.logo = /images/logo.png
Executing the script /opt/shibboleth-idp/bin/./build.sh will rebuild the war file. This can be copied from /opt/shibboleth-idp/war directory to /path/to/tomcat/webapps directory in tomcat and execute the following script to start Tomcat.
/path/to/tomcat/bin/./startup.sh
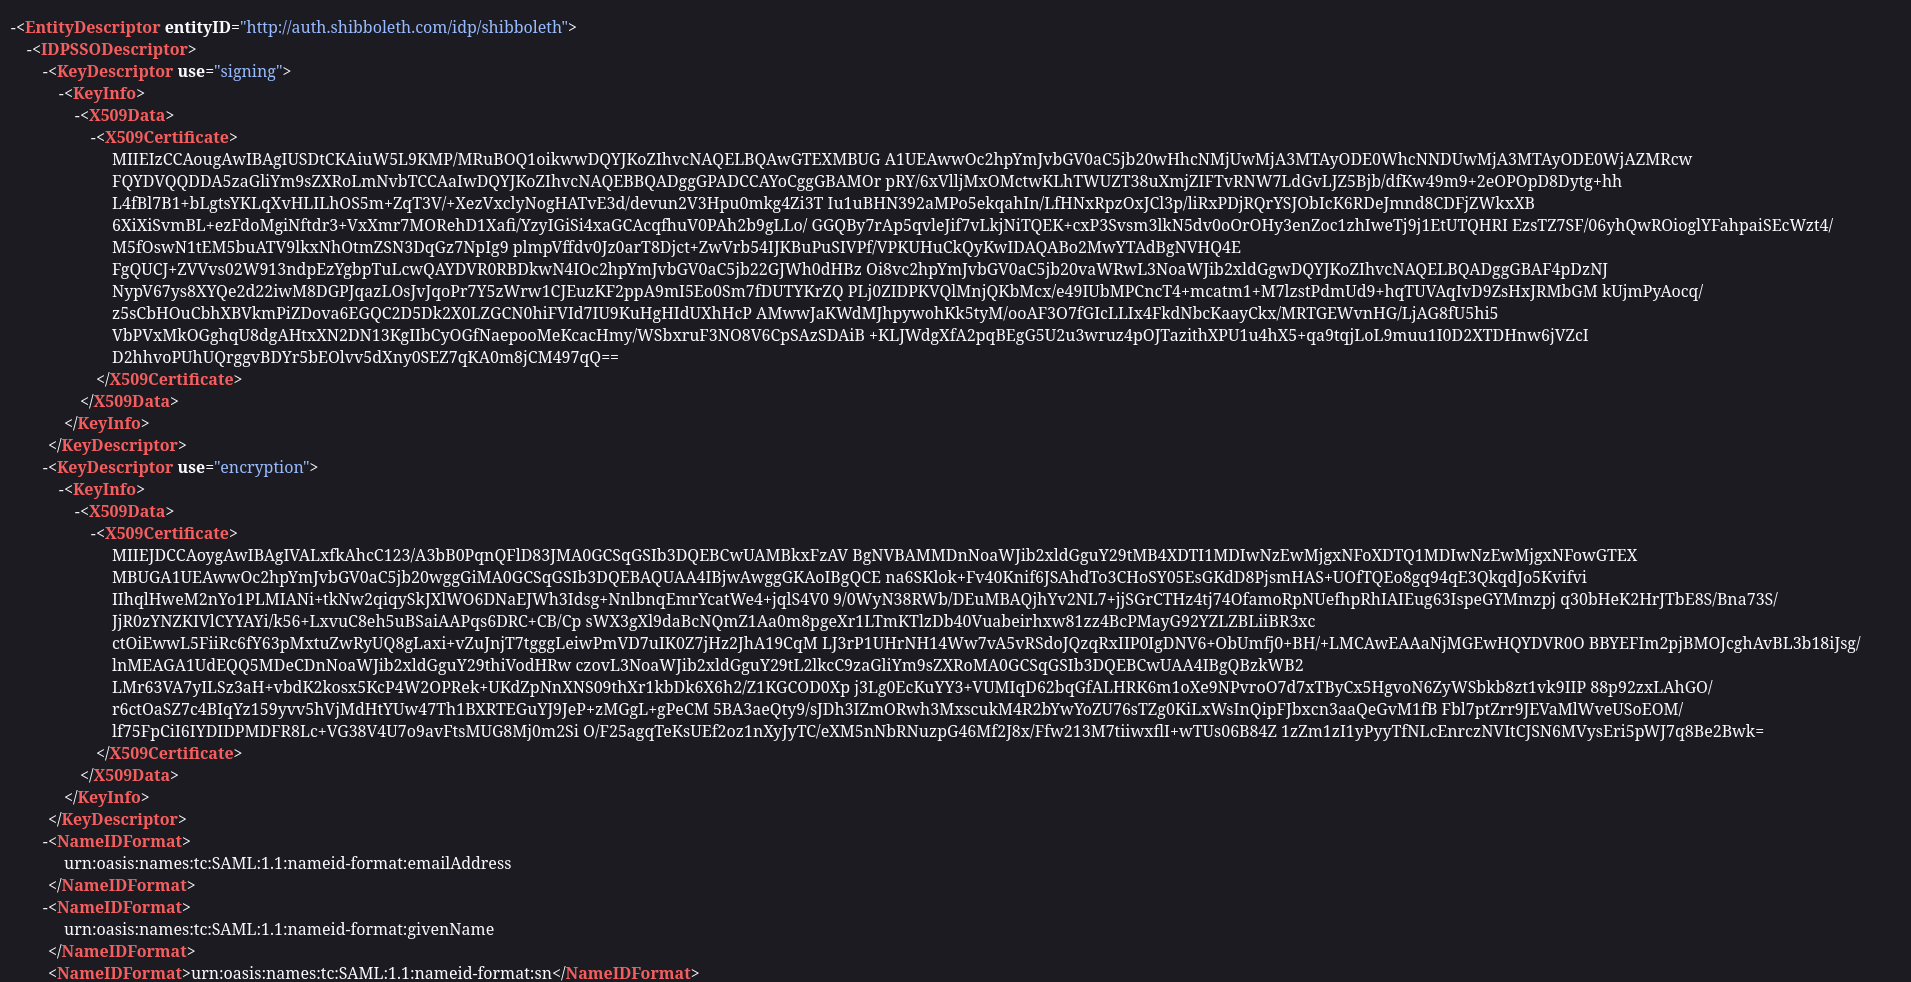
As this is a new installation we will need to generate the SAML IDP metadata. This metadata can contain a variety of different components from Entity IDs to SSO and SLO endpoints to certificates for signing and encrypting SAML requests and responses between IDP and SP.
Shibboleth provides a plugin called Metadatagen. This plugin once installed provides a script to generate the XML file containing the metadata for the SAML IDP. The plugin can be installed with the following command:
/opt/shibboleth-idp/bin/./plugin.sh -i https://shibboleth.net/downloads/identity-provider/plugins/metadatagen/2.0.0/idp-plugin-metadatagen-dist-2.0.0.tar.gz
The following command is an example to generate the SAML IDP metadata for our example. The command includes flags to add certs to sign and encrypt as well as NameID format for user attributes. In addition you can add the following flags --logout <insert_url> and --sso <insert_url> for Single Sign-On (SSO) and Single Log-out (SLO) URL endpoints. For system administrators you can also add the flag --contact-admin, --contact-support and --contact-tech to provide contact details for anyone having issues configuring their SP to work with your deployment of Shibboleth IDP.
/opt/shibboleth-idp/bin/./metadatagen.sh
   --entityID https://auth.example.com/idp/shibboleth
   --signing /opt/shibboleth-idp/credentials/idp-signing.crt
   --encryption /opt/shibboleth-idp/credentials/idp-encryption.crt
   --nameid-format urn:oasis:names:tc:SAML:1.1:nameid-format:emailAddress
   --nameid-format urn:oasis:names:tc:SAML:1.1:nameid-format:givenName
   --nameid-format urn:oasis:names:tc:SAML:1.1:nameid-format:sn
   --file /opt/shibboleth-idp/metadata/idp-metadata-test.xml
After generating the metadata make sure to uncomment the following line in /opt/shibboleth-idp/conf/idp.properties . Once Shibboleth has restarted the metadata can be found at the following URL for all SPs to access: https://auth.example.com/idp/shibboleth.
idp.entityID.metadataFile=%{idp.home}/metadata/idp-metadata.xml
Shibboleth provides a modular framework for enabling features such as Terms and Conditions, MFA etc. These can be enable with the /opt/shibboleth-idp/bin/./module.sh script. When enabling these modules new configuration files are also created to configure the modules which are not activated by default.
/opt/shibboleth-idp/bin/./module.sh --enable idp.authn.MFA
#  ------------ OUTPUT ------------ #
INFO  - Including auto-located properties in ./../conf/admin/admin.properties
INFO  - Including auto-located properties in ./../conf/authn/authn.properties
INFO  - Including auto-located properties in ./../conf/c14n/subject-c14n.properties
INFO  - Including auto-located properties in ./../conf/saml-nameid.properties
INFO  - Including auto-located properties in ./../conf/services.properties
INFO  - Including auto-located properties in ./../conf/ldap.properties
WARN  - Ignoring duplicate property 'idp.authn.LDAP.bindDNCredential'
WARN  - Ignoring duplicate property 'idp.attribute.resolver.LDAP.bindDNCredential'
Enabling idp.authn.MFA...
        conf/authn/mfa-authn-config.xml created
[OK]
Shutdown and restart tomcat with the following scripts /path/to/tomcat/bin/./shutdown.sh and /path/to/tomcat/bin/./start.sh.
Once running the IDP we can configure reverse proxy such as Apache2 to make the IDP securely exposed and accessible with HTTPS. Apache2 can be configured with the CA signed certificates to ensure HTTPS protocol is using the private key and CA certificate. The AJP connector functionality allows Apache2 to connect transparently to Tomcat without needing to directly expose Tomcat.
vim /etc/apache2/sites-enabled/shibboleth.conf
# ------------------------------------------ #
<VirtualHost *:80>
    ServerName auth.example.com

    RewriteEngine On
    RewriteCond %{HTTPS} off
    RewriteRule ^(.*)$ https://%{HTTP_HOST}%{REQUEST_URI} [L,R=301]

    Redirect permanent / https://auth.example.com:443/
</VirtualHost>
<VirtualHost *:443>
    ServerName auth.example.com

    SSLCertificateFile      /path/to/certs/example.com.pem
    SSLCertificateKeyFile   /path/to/certs/example.com.key
    SSLCertificateChainFile /path/to/certs/chain-example.com.crt

    ProxyPass /idp ajp://127.0.0.1:8009/idp/ retry=0

</VirtualHost>
All Shibboleth configuration is done via XML files stored in /opt/shibboleth-idp/conf/. SAML uses XML metadata presented by the IDP and SP to share the required configurations for the respective components to send and receive attributes, keys/certs, SAML endpoints etc. The Shibboleth IDP requires the metadata for each SP to be configured in the metadataProvider.xml. There are a series of different mechanisms to configure the SP metadata. Although we are using FilesystemMetadataProvider in our example we can use FileBackedHTTPMetadataProvider to provide a metadata URL that is queried first which is stored as local XML file, incase the URL is inaccessible the previously stored metadata XML file is used.
vim metadataProvider.xml
# -------------------- #
<MetadataProvider
    id="cloud.example.com"
    xsi:type="FilesystemMetadataProvider"
    xmlns="urn:mace:shibboleth:2.0:metadata"
    metadataFile="%{idp.home}/metadata/cloud.example.com.xml">
</MetadataProvider>
Configuring any SSO will require a user directory or backend of some type from LDAP to SQL DB. Shibboleth IDP provides a series of method to connect to a user backend of choice with LDAPConnector, RelationalDatabaseConnector etc. The XML configuration file attribute-resolver.xml can be used to configure the LDAP connection. The XML component DataConnector accepts the configuration items ldapURL, baseDN, principleDN(bindDN), principleCredential(bindDNCredential) and more that are relevant to make a connection with the LDAP server.
vim attribute-resolver.xml
# ---------------------- #

<!-- LDAP Connector -->
<DataConnector id="myLDAP" xsi:type="LDAPDirectory"
                ldapURL="%{idp.authn.LDAP.ldapURL}"
                baseDN="%{idp.authn.LDAP.baseDN}"
                principal="%{idp.authn.LDAP.bindDN}"
                principalCredential="%{idp.authn.LDAP.bindDNCredential}"
<FilterTemplate>
        <![CDATA[
                %{idp.authn.LDAP.searchFilter}
        ]]>
</FilterTemplate>
</DataConnector>
A file named ldap.properties can be defined with certain configurable variables that are referenced in the XML configuration. This file is a simple key=value pair for each of the properties.
vim ldap.properties
# --------------- #

idp.authn.LDAP.baseDN = ou=people,dc=my-domain,dc=com
idp.authn.LDAP.searchFilter = (uid=$resolutionContext.principal)
idp.authn.LDAP.bindDNCredential = secret
idp.authn.LDAP.bindDN = cn=Manager,dc=my-domain,dc=com
idp.authn.LDAP.ldapURL = ldap://localhost
With regards to LDAP, Worteks provides a simple to use tool called LDAP ToolBox with a CLI tool called slapd-cli which can be used to backup, modify and restore openldap data and configurations.
Once shibboleth is able to connect to the LDAP server the users and their attributes need to be resolved to their appropriate variable name or user-specific customisations such as setting certain static values or modifications. Shibboleth IDP providers the administrator full ability to customise the attributes. The following is an example of the variables we can use in our test environment.
vim attribute-resolver.xml
# ---------------------- #

<AttributeDefinition xsi:type="Simple" id="uid">
        <InputDataConnector ref="myLDAP" attributeNames="uid" />
        <AttributeEncoder xsi:type="SAML1String"
                name="urn:mace:dir:attribute-def:uid" />
        <AttributeEncoder xsi:type="SAML2String"
                name="urn:oid:0.9.2342.19200300.100.1.1" friendlyName="uid" />
</AttributeDefinition>

<AttributeDefinition xsi:type="Simple" id="mail">
        <InputDataConnector ref="myLDAP" attributeNames="mail" />
        <AttributeEncoder xsi:type="SAML1String"
                name="urn:mace:dir:attribute-def:mail" />
        <AttributeEncoder xsi:type="SAML2String"
                name="urn:oid:0.9.2342.19200300.100.1.3" friendlyName="mail" />
</AttributeDefinition>

<AttributeDefinition xsi:type="Simple" id="sn">
        <InputDataConnector ref="myLDAP" attributeNames="sn" />
        <AttributeEncoder xsi:type="SAML1String"
                name="urn:mace:dir:attribute-def:sn" />
        <AttributeEncoder xsi:type="SAML2String"
                name="urn:oid:2.5.4.4" friendlyName="sn" />
</AttributeDefinition>

<AttributeDefinition xsi:type="Simple" id="givenName">
        <InputDataConnector ref="myLDAP" attributeNames="givenName" />
        <AttributeEncoder xsi:type="SAML1String"
                name="urn:mace:dir:attribute-def:givenName" />
        <AttributeEncoder xsi:type="SAML2String"
                name="urn:oid:2.5.4.42" friendlyName="givenName" />
</AttributeDefinition>
Shibboleth IDP also provides customisation to filter attributes to meet the requirements of the SP. These attributes are the usual basics such as givenName, sn, mail etc. Shibboleth IDP provides this configurability in attribute-filter.xml. This is a simple way to limit the information that is shared between an IDP and SP while also allowing for some privileged or demanding SPs to receive more information than other SPs. The value defined in this configuration refers to the entityID of the service provider protecting with Shibboleth.
vim attribute-filter.xml
# -------------------- #
<AttributeFilterPolicy id="nextcloud">
    <PolicyRequirementRule xsi:type="Requester" value="https://cloud.example.com" />
    <AttributeRule attributeID="uid">
        <PermitValueRule xsi:type="ANY" />
    </AttributeRule>
    <AttributeRule attributeID="mail">
        <PermitValueRule xsi:type="ANY" />
    </AttributeRule>
    <AttributeRule attributeID="sn">
        <PermitValueRule xsi:type="ANY" />
    </AttributeRule>
    <AttributeRule attributeID="givenName">
        <PermitValueRule xsi:type="ANY" />
    </AttributeRule>
</AttributeFilterPolicy>
NextCloud
Now that the IDP is configured we will deploy Nextcloud as our SP to protect the authentication with SAML SSO. I have chosen to use Docker compose to deploy Nextcloud with the following configuration.
services:
  nextcloud:
    container_name: nextcloud
    image: linuxserver/nextcloud:30.0.5
    ports:
      - 80:80
    volumes:
      - /path/to/nextcloud/config/:/config
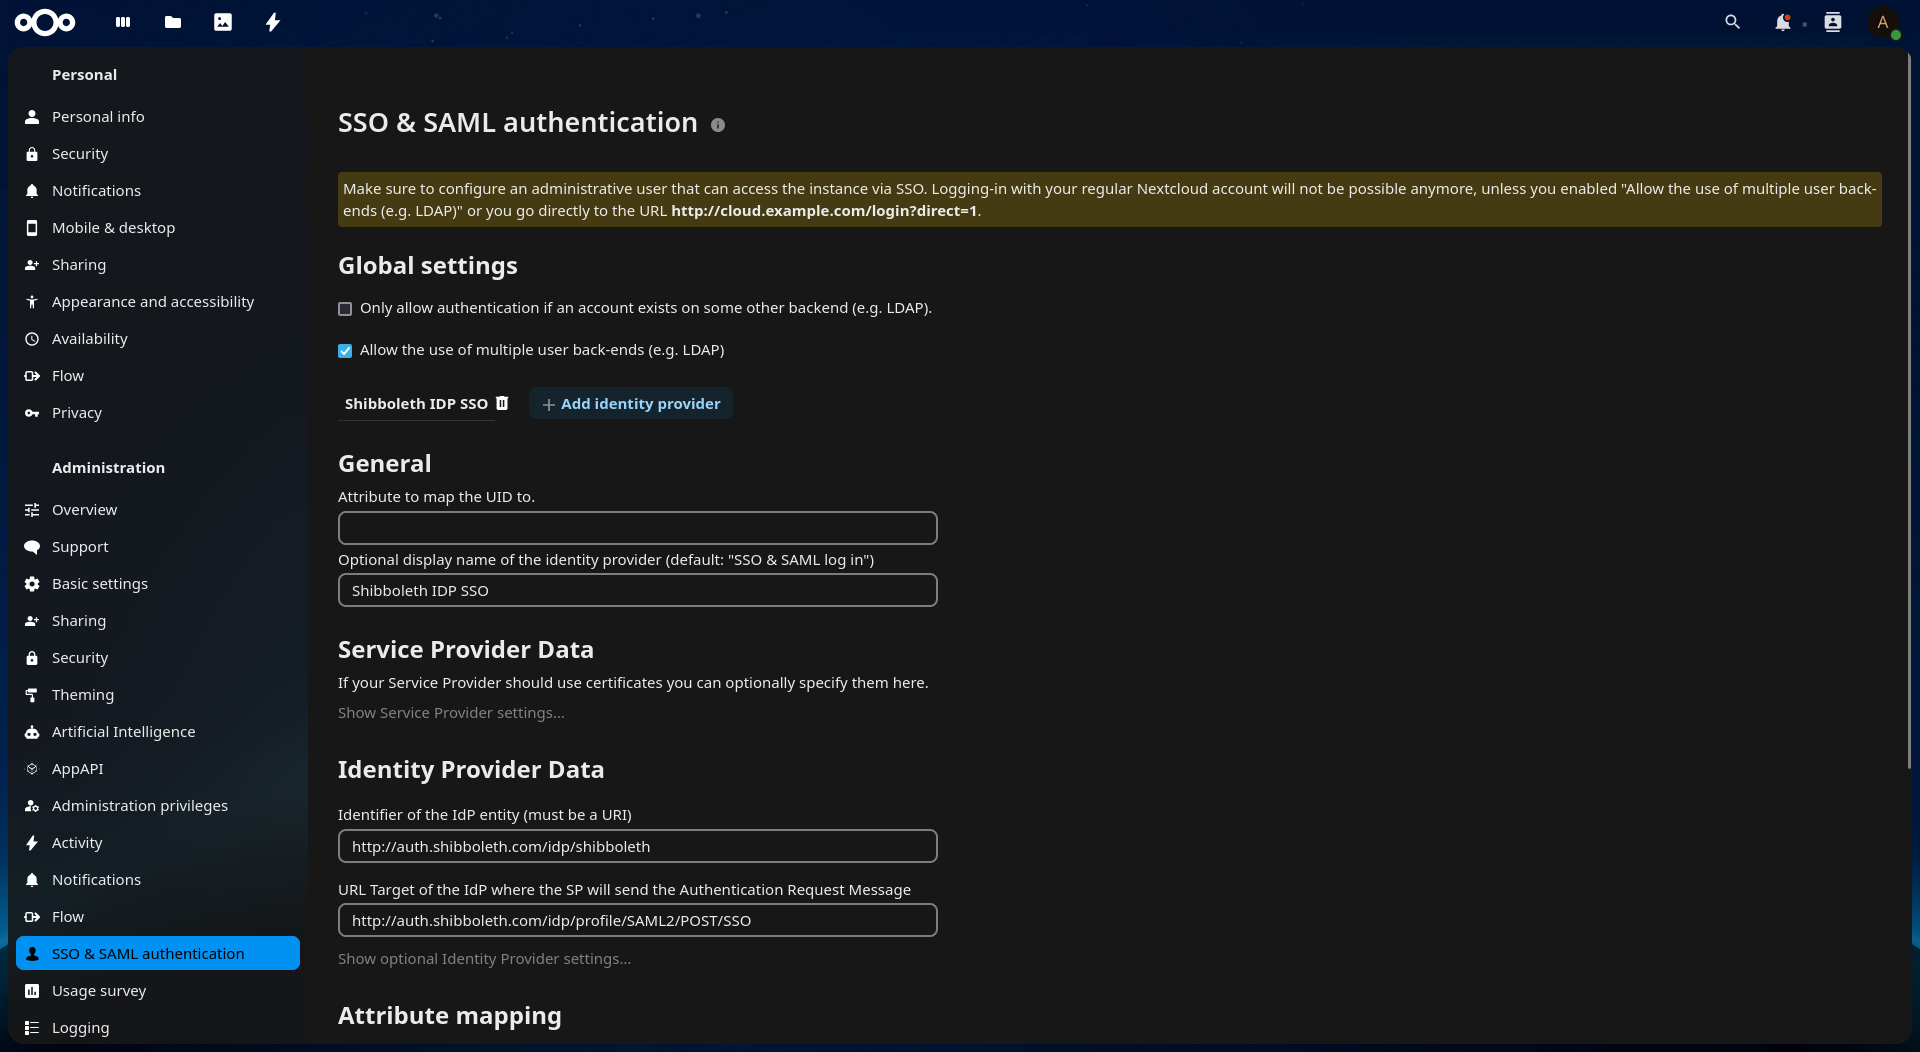
Nextcloud will ask to create an admin account when setting it up for the first time. You will need to install the App SSO & SAML authentication which will enable the SAML SSO feature. An important aspect of the configuration is to enable the following option Allow the use of multiple user back-ends (e.g. LDAP) to ensure both direct login and SAML Login are available as options to users and admins.
Once the SAML configuration has been validated the metadata for Nextcloud can be downloaded at the following URL: Nextcloud SAML Metadata URL
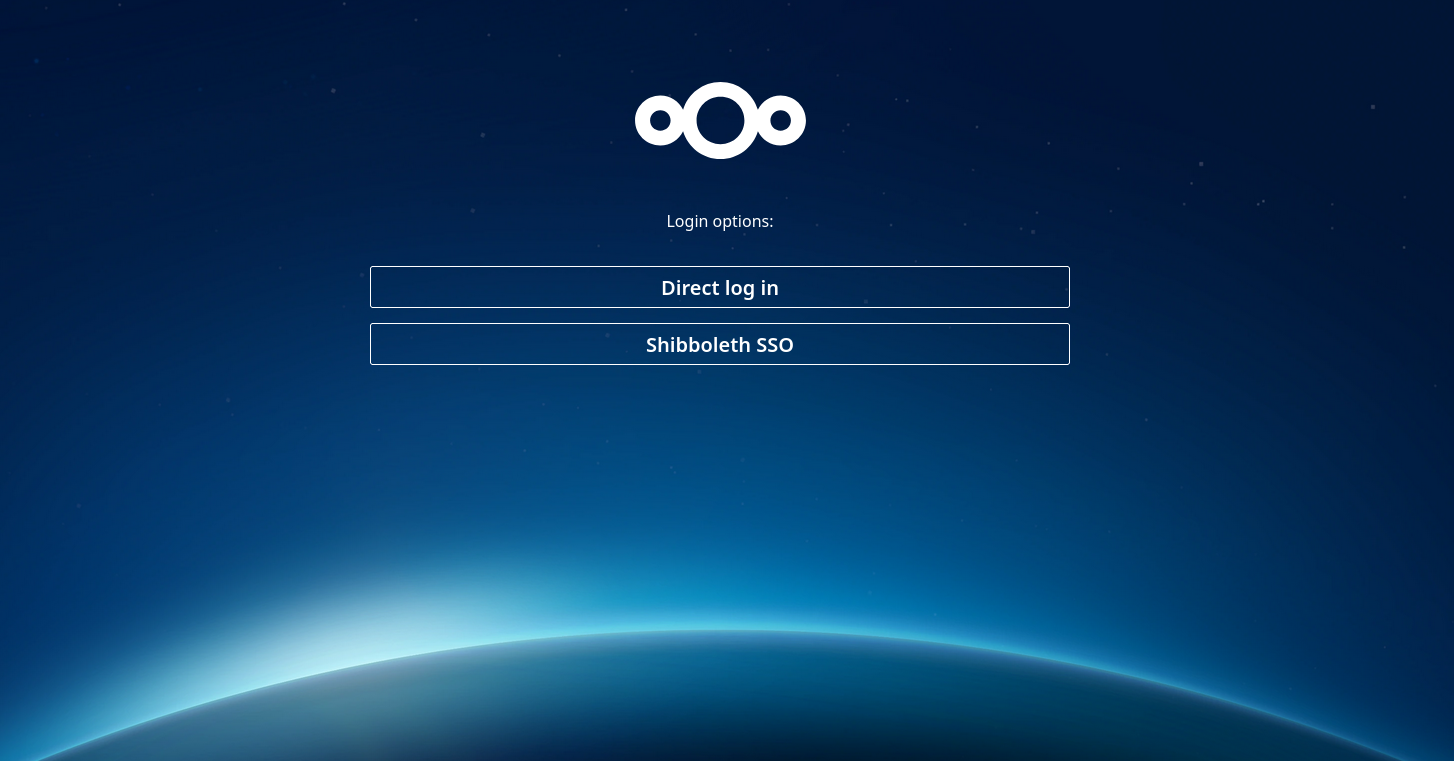
The login page for Nextcloud should look as following enabling the option to log into both the Nextcloud default backend which can be configured with an LDAP server or the Shibboleth IDP that we have configured.